|
|
Post by Admin on Jan 24, 2016 17:42:15 GMT
You do this modification at your own risk if you choose to proceed.The reason I made the video was to show how its possible to remove the N7 internal battery completely and power the N7 directly from the car battery. The N7 works in exactly the same way as far as Timur's kernel and suspend/wake are concerned. All this mod does is to replace the internal battery with the car battery, in effect this mod will now make the N7 be wired like a regular car head unit with no internal battery drain or overheating ( as there is no internal battery to drain), there will obviously be a small drain on the car battery, but this is extremely minimal and should not effect the car battery with normal car use (I have had my car sitting for 3 weeks with no noticeable drain on the car battery). Video is here youtu.be/9N2Bh4fI8Bo please follow the video exactly. The steps to follow:make sure you power down the N7 before disconnecting the battery (and every time the battery is disconnected) 1, Remove the back cover and remove the internal battery, there is a diss-assembly video here youtu.be/lkO8bY4lryY2, remove the PCB and battery connectors from the battery (use nail scissors or similar), now safely dispose of the battery. 3, from a USB charging/data cable cut the micro USB end off and locate the +ve and -ve cables (red and black in this case, the other cables can be cut as they are not required) 4, Tin the ends of the USB cable and the battery connectors 5, add an additional -ve cable as shown in the video, this will need to be soldered to one of the black cables of the battery plug (without this connection it will not work) 6, Solder the USB cables to the battery connectors previously tinned, and then connect the separate -ve cable to one of the black cables of the battery plug (pay attention to -ve and +ve) 7, wrap any exposed cables with tape, and tape up the battery PCB. 8, Cut a hole in the back of the N7 case to allow the USB cable to go through. 9, reconnect the battery plug to the N7 and replace the back cover. You are now ready to power up the N7 with the power button (it may take a while the first time) To connect the N7 to the car you can plug the USB cable into a USB car charger (5v) that has a permanent supply (alternatively you can cut the USB end off and connect to a voltage regulator). Plug in the OTG cable as usual as this is used to suspend and wake the N7 via Timur's kernel as this will supply power to the N7 via the charging port, but it will not charge the N7 as it will already be reading full capacity from the car battery and will only be used to suspend and wake (along with other normal operations) Hope this help those that are having battery and overheating issue's, but please I would recommend only doing if you are confident with electronics and soldering, or you have a friend that has the ability to help. Cheers Kev
|
|
|
|
Post by scottjackson1209 on Feb 11, 2016 0:09:41 GMT
So I've done this mod with amazing success but I now have an issue. whenever I'm streaming music and using navigation at the same time the screen will flash off then on and the apps will all be closed. I think it's drawing too much power...I'm using a 5V 2.1A charger...would a 2.4A charger solve this issue?
|
|
|
|
Post by Admin on Feb 11, 2016 0:18:43 GMT
So I've done this mod with amazing success but I now have an issue. whenever I'm streaming music and using navigation at the same time the screen will flash off then on and the apps will all be closed. I think it's drawing too much power...I'm using a 5V 2.1A charger...would a 2.4A charger solve this issue? The charger should be suitable, unless it may be a faulty charger of course, I have a similar charger spec and I have no problem, maybe there is a conflict with the navigation and music app you are using for streaming ... Try using google maps with xillalive and see what happens, thats what I use, I like xillalive (I have the pro version) because you can have favourite station widgets, which makes changing stations really easy (I am not aware of another music app that does that) It may be worth trying different apps first, then if the problem is still there try another charger in case the one you are using is faulty. |
|
|
|
Post by JEGsGarage on Mar 1, 2016 1:46:51 GMT
Got a couple questions. I have my spare battery taken apart and Im ready to build the power hook up.
Im working on an 2012 model N7. Do you know if I have to do the second black wire hookup? Not sure Im understanding the point of that if youre just supplying power to the same two points as the battery. Wondering if there is something different between the 2012 and 2013.
Also...what is the little white thing that you were careful to trim around at the battery? I ended up cutting my board off without that. I can easily attach it. But wanted to see what it is and make sure I need it. Is it a fuse? (EDIT: I see that it is both a temp protection circuit as well as over-current protection. Question is...do I really need it now?)
Thanks!
Justin
|
|
|
|
Post by JEGsGarage on Mar 1, 2016 2:43:33 GMT
Ok. Just a progress report. Largely a success. I have my Tablet running on "external power". Timur ROM works as before, no issues. Here are a couple of pictures of the N7 2012 version's battery board as well as the hook up. I did NOT use the little heat switch, nor did I solder a wire from the V-neg to the connector. Ide still like to know the purpose of that...thinking maybe just for a cleaner ground?    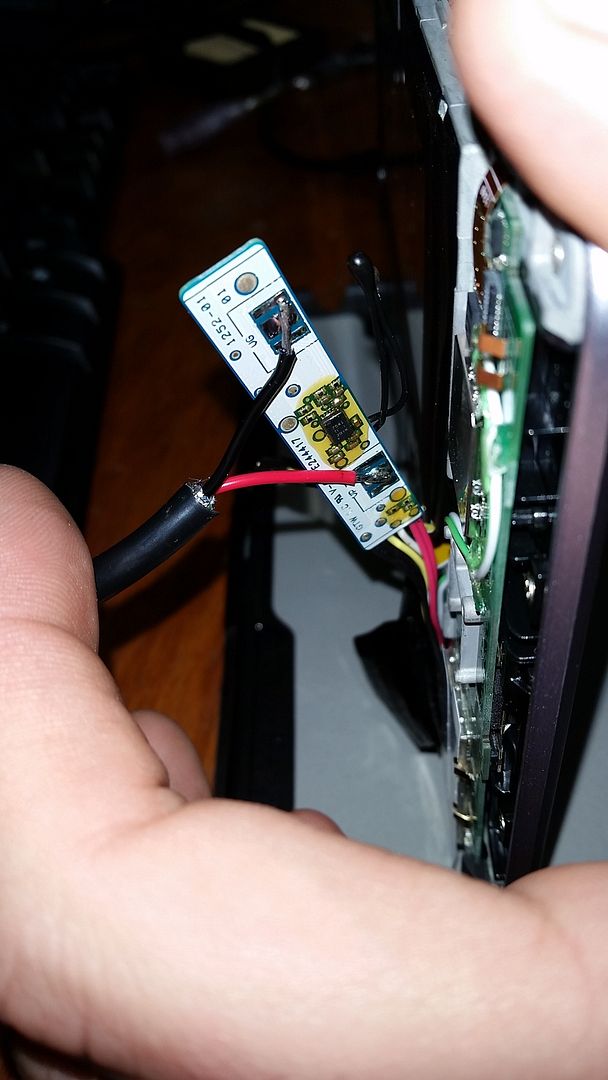 As I said, it all works as expected so far. So, I wanted to try the fastboot. Because my thought was, what if I have to disconnect the battery on the car? That doesnt happen very often, but my power button will be VERY hard to reach. Ill probably end up just extending it. But I changed the fastboot (thanks for the write up btw!). Now, when I have the OTG cable plugged into the tablet, but NOT powered, then I apply battery power back to the tablet main cable, I get the google screen, but then it goes off. It doesn't boot. Only when I disconnect the OTG cable. I even tried plugging the OTG cable into power, and I thought it was going to work, but again it stopped after the google screen. Am I missing something here? What I will probably do is just extend my power switch. I already have wires extended to a second set of pogo connectors that I installed during a failed first attempt at a car install haha. Long story. If I do that, Ill be changing the fastboot back to stock I guess. |
|
|
|
Post by Admin on Mar 1, 2016 8:12:57 GMT
Got a couple questions. I have my spare battery taken apart and Im ready to build the power hook up. Im working on an 2012 model N7. Do you know if I have to do the second black wire hookup? Not sure Im understanding the point of that if youre just supplying power to the same two points as the battery. Wondering if there is something different between the 2012 and 2013. Also...what is the little white thing that you were careful to trim around at the battery? I ended up cutting my board off without that. I can easily attach it. But wanted to see what it is and make sure I need it. Is it a fuse? (EDIT: I see that it is both a temp protection circuit as well as over-current protection. Question is...do I really need it now?) Thanks! Justin Hi Justin, I didnt attempt this with the 2012 N7 so cant 100% say for sure what will happen, the black wire I have no clue what it does, just I couldn't get mine to power up without it, but I hav had reports that others have not connected it and their N7 works perfectly .. strange but if it works it works  .. So does your set up work now, ? The fastboot, should work when it senses power to the charging USB cable controlled by the IGN switch only .. so if you reconnect the battery on the car the N7 will not turn on, but if you then turn the ign on (power to the USB charging cable), it will begin the boot up process The circuit I left in, I assume it has all the electronics and sensors for the battery control i.e. temp sensor, etc, I have known people do this mod and leave that circuit out only to have problems .. the tablet not showing 100% for example which caused them problems with something else (cant quite remember what) so best to leave that in .. EDIT ... one thing I will say, if you disconnect the power (I mean the battery power not the charging cable) from the N7 without shutting it down properly (by the switch) it may take longer to boot up .. This may have something to do with it not going through a proper shut down sequence ... there are software apps that can shut the N7 down without you having to use the power off button if you ever need to remove the car battery or the N7 from the car. so give it a while when you connect it to the battery and the google screen comes on to go through the boot up sequence .. |
|
|
|
Post by JEGsGarage on Mar 1, 2016 13:13:05 GMT
Ok thanks. I didnt have any issues with it powering on by only connecting the red and black power cables. I also didnt see any ill effects of leaving the temp switch out. The sensor probe is still there, but again, I dont think I will really need to worry about this. There is SOME heat on that little board, but I think that is to be expected as its got current going through it. My battery shows "100% - Not Charging" with just the power wires hooked in. And "100% - Full" when the OTG cable is plugged in. I didnt have much luck with fastboot doing what I wanted, but I didnt let it go too long. As soon as the Google screen came up a second time, I thought maybe it was boot looping. So I pulled the OTG cable, and it booted right up. I think I like the idea of installing an external switch for power anyway. I do have an app that lets me do shutdown/start up. My first install I had grand plans of making the tablet removable. I had a plan to have the bezel slide out, and allow me to just remove the tablet. I added a second set of pogo connectors, and ported all of the USB connections to them including OTG and power switch. That was a nogo. The pins were not easy to line up, and connection wasnt reliable. I wasted a lot of time on this. Last night I swapped USB boards, and removed my wiring except for the switch. Im fully committed to this being a permanent install. So Im all about extending the power switch, moving the USB plug into all that new found space where the battery was, and hacking up the rear cover so I can remote mount the GPS and WiFi antennas. As you could see from my last install in the videos, I had to overcome some things that I dont have to worry about here. Like not having access to the home and back soft buttons. I LOVE the information on this site so far. The no-battery mod and ideas for staying on while cranking were worth the price of admission Justin |
|
|
|
Post by Admin on Mar 1, 2016 18:05:32 GMT
Ok thanks. I didnt have any issues with it powering on by only connecting the red and black power cables. I also didnt see any ill effects of leaving the temp switch out. The sensor probe is still there, but again, I dont think I will really need to worry about this. There is SOME heat on that little board, but I think that is to be expected as its got current going through it. My battery shows "100% - Not Charging" with just the power wires hooked in. And "100% - Full" when the OTG cable is plugged in. I didnt have much luck with fastboot doing what I wanted, but I didnt let it go too long. As soon as the Google screen came up a second time, I thought maybe it was boot looping. So I pulled the OTG cable, and it booted right up. I think I like the idea of installing an external switch for power anyway. I do have an app that lets me do shutdown/start up. My first install I had grand plans of making the tablet removable. I had a plan to have the bezel slide out, and allow me to just remove the tablet. I added a second set of pogo connectors, and ported all of the USB connections to them including OTG and power switch. That was a nogo. The pins were not easy to line up, and connection wasnt reliable. I wasted a lot of time on this. Last night I swapped USB boards, and removed my wiring except for the switch. Im fully committed to this being a permanent install. So Im all about extending the power switch, moving the USB plug into all that new found space where the battery was, and hacking up the rear cover so I can remote mount the GPS and WiFi antennas. As you could see from my last install in the videos, I had to overcome some things that I dont have to worry about here. Like not having access to the home and back soft buttons. I LOVE the information on this site so far. The no-battery mod and ideas for staying on while cranking were worth the price of admission Justin Good stuff .. Yes I think removable tablet is not really needed .. just complicates things quite alot .. and N7's are quite cheap on Ebay if anything goes wrong with it or it gets nicked .. I have a GPS re-radiator antenna to improve the GPS signal which works great you can see some tests here goo.gl/photos/VcEtNxzWuaey1u9n9 .. the first picture is actually a video so you can click on it and it will play, but chopping up and relocating the internal GPS may be a good option. Post some pics when you have done that. By the way thats my install in my van .. so not a particularly pretty install .. but it's and old van for work so not bothered about the look, there are also some pics of my Mercedes and the location of the external antenna an the boot |
|
|
|
Post by phatbuddha56 on Mar 7, 2016 23:57:44 GMT
Easy mod to do. Tab wakes up with no lag but don't know why every time it's taking a good minute to enter sleep mode when car is shut off. Got the tab plugged into a usb 5v step down wired to constant from harness and otg plugged in as usual. Anyone got any idea why it's taking that long to enter sleep? Never had this problem before until this mod was done
Update: Problem somehow fixed itself, all good now
|
|
|
|
Post by JEGsGarage on Mar 10, 2016 15:50:00 GMT
Well... I have some updates. Most aren't great. Haha. First to phatbuddha56. I just had the exact problem. Never had this issue before with my tablet install from the years of use. And like yours, it fixed itself after a power cycle or two. So, I had the power all figured out. I was testing with a wall wart though. When I switched to a power adapter running off of a 12v power supply, I couldn't get the tablet to fire up at all. This perplexed me for a bit. So I tried Kevin's trick with the ground wire. THAT WORKED!!! No idea why on earth it makes a difference. Its the same darn voltage going to the same darn spots. But using a 12v source just wasn't working vs using the wall wart output. At this point I'm stoked. I have a nice power cable made up. My whole install is contained in a double din radio sized space. Feeling great. Time to test some usb hubs. Now the OTG/Wake/Sleep isn't working!!! I could NOT get the Timur Rom functions to work while powered off the 12v source, connected through the battery board, with the ground wire. ZERO OTG function as well. I couldn't get my DAC to power on. I switched to the battery and viola, works perfect again. It really made me angry haha. The only thing I can possible imagine, is that there is TOO much voltage. Output is around 5.15v, which runs the tablet fine. Im wondering if the wake/sleep trigger depends on the battery being slightly below full. Even if at 99.9998%. If its totally full, Im wondering fi the OTG/charge cable just remains in an unused state? Others have seemingly gotten this to work though, so Im at a loss. I have the battery back in because I was sick of having my dash torn apart. I needed a break. Any input on this would be awesome! Anyway...you mentioned you wanted to see my GPS antenna. I have this little square plastic piece, pretty much directly in front of me near the wind screen that pops out. It covers a dash bolt. With a pass through right into the radio area. So I peeled the antenna off the cover, stuck it to the underside of this piece, soldered wires to it (22 ga hook up wire), and secured the wire as best I could. It works!! Signal probably isnt as good as it could be, but I had NO issues navigating this morning. Usually, with the antenna on the cover behind the dash, I get a drop out here and there. I took a pic of the signal strengths. Again, not stellar SNR, but plenty of satellites.   Just a quick pic of my install so far. I REALLY want to ditch the battery. If for no other reason so I can get the back of my tablet back into shape. I had all my wires secured and used the space where the battery was. Now its all messy. Still need to finalize my headunit faceplate mounting.  Justin |
|
|
|
Post by Admin on Mar 10, 2016 15:54:27 GMT
Justin,
When you power down, is the tablet still showing that its charging .. i.e. the little lightening symbol through the battery, there were issue's with this casuing the tablet not to go to sleep, I can only describe it as a power loop. ?
|
|
|
|
Post by JEGsGarage on Mar 10, 2016 17:59:24 GMT
When I was connected via 12v power supply, through the 5v adapter, and through the battery board, I didnt get the charge symbol at all. If I remember correctly. I would have to do some more testing.
I never know what order to attach/power things up. Sometimes when plugging/unplugging the OTG while its running, the tablet will freeze and reboot. Its weird.
I tried rebooting, disconnecting and reconnecting OTG, etc etc. Couldnt get it to work. I might give it another try. I just couldnt take not having a dash any longer. lol.
|
|
|
|
Post by Admin on Mar 10, 2016 19:02:27 GMT
By the way I like the GPS mod .. will have to do that to mine when I get the time ..
|
|
|
|
Post by JEGsGarage on Mar 10, 2016 19:16:11 GMT
It seems to work pretty well. Like I said, my SNR is a little sketchy. I used WAY more hook up wire than I needed to. Since I didnt want to short myself. So I might trim a foot or so off, and see if it helps clear up the signal some. I have a feeling its the length of hook up wire though, so I might even move the antenna closer to the tablet/center of dash.
|
|
|
|
Post by gstiles on Mar 13, 2016 7:39:18 GMT
Hi there,
Thanks for all the info on this mod, I have done the battery delete and all seems fine, except I am having the same problem as Justin. I cannot get the tablet to go into Timur's Rom mode via OTG while connected to 12v. Again when I switched back to the battery it worked fine.
Anyone have any ideas on why this might be?
Thanks
Graeme
|
|


 ..
..